Sunday, March 31, 2013

Little bench with farmhouse scene

 
Here's another quick and easy transformation.
 
In anticipation of my downstairs remodel, I have been re-doing a few pieces.
I think my decorating style is ecclectic. I like a little bit of this and a little bit of that. I just can't choose one style! I like mixing rather than matching and I hope I can achieve a look that is coordinated and not all over the place...LOL! 
 
The remodel is still a long way off, but I reckon I might as well get an early start.
 
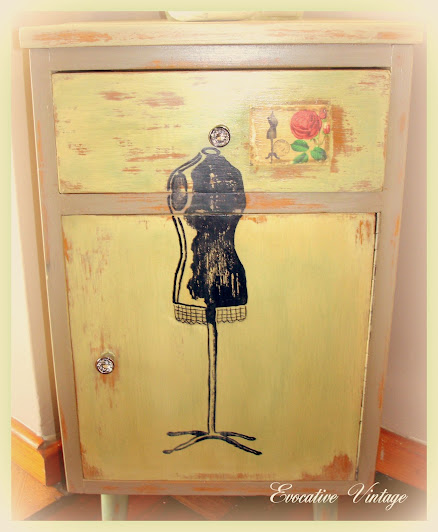
I've had this little fleamarket found bench for a while and finally got some inspiration for its new look! This little bench has so much character with all its dings, nicks and surface scratches!
 
I decided to adorn it with farmhouse scene silhouette images. I went to Knick of Time and The Graphics Fairy for my images. Thank you Angie and Karin for helping us on our journey of creating special memories!
 
 
For the transformation I used Evolve paint. It is a new line of paint available from Builder's Warehouse and it is 100% lead free. There are some gorgeous colors in this range from neon greens to bright oranges, soft pastels and grounded neutrals.
 
 I gave my bench a layer of 'Stone Washed Jeans' and when it was dry I slapped on a layer of 'Old Boot'. While this layer was still wet, I dragged an old credit card through the wet paint making sure the paint was settling into all the nooks and crannies!
 
I also distressed it with the credit card to create that chippy paint effect!


I used the graphite transfer method to transfer the images and then I filled them in with acrylic paint. The rooster and birds are from Knick of Time and the little girl playing with a sweet lamb is from the Graphics Fairy!
 
I distressed through the images here and there, and applied some clear and dark wax all over!
 
 
I love the transformation!
 
On a nother note, I'm excited to share a recent purchase with you....2 larder cupboards in true shabby chic farmhouse style. I will use one of the cupboards in my new kitchen and the other in my new utility room which is going to be built onto the existing kitchen.
I bought these beauties through the folks at 'Moving On'. They help people sell their unwanted stuff! I paid about $300 for both! Can't wait to have them delivered!
 
Don't you just love them???


Source


Source

You can often find me at these fabulous parties:


Saturday, March 30, 2013

Beach sign with Salvaged Wood

 
I am starting to repurpose old wood and cabinet doors. I made 2 signs using old cabinet doors, but I am not ready to show you yet. I want to add coat hooks or door knobs to make them more functional.
 
However I am excited to show you my BLISS SIGN!
 
This was just an old piece of scrap wood (I believe its oregon pine) that I begged off one of the guys who works at a furniture manufacturer. They make furniture entirely from salvaged wood!
 
Because it is like tongue and groove, I decided to give each strip a different color and I wanted the finished effect to look like sand, sea and sun!
I guess I want Summer back, now that Winter is fast approaching!
The wind is howling outside as I am typing this!
 
 I used a paint color called Mosaic from Plascon on the bottom strip, a mix of blue and turqouise on the middle with bits of white to look like sea foam and Mesa Sunset from CeCe Caldwell above that. Above the Mesa Sunset I filled in some CeCe Vintage White to look like clouds. The thinnest strip right at the top I finished off with blue-turqouise color. I then sketched some sun rays with Omaha Ochre from CeCe and stencilled on the word 'Bliss'. I wanted the letters to have a wavy feel to it and that's why I did in a random fashion!
 
 
I distressed it for that tiime worn look and gave it a coat of clear varnish to make the colors pop!
I added hangers on the back, an aqua satin ribbon and a fabric rose and hung it!
Sorry about the shadows...I took these pics at night!
Another quick and easy project that cost me nothing as the wood was free and all the other stuff I already had!


Its a happy little sign and I love it!
 
You can often find me at these fabulous parties:


Wednesday, March 27, 2013

Vintage painter's tray repurposed

I love quick and easy projects and this one was right up my alley....
 
 You know how I love to bid at online auction, and I won this chum with the highest bid of.....Drum Roll Please!!!....ONE measly Rand. How much is that in dollar terms? $0.11...I did a quick conversion online...lol.
Seems like no one saw a use for this humble, old metal painter's tray, but I knew exactly what I wanted to do with it!
 
 
I bought a litre of Dekro roof paint which cost a third of the price of chalk board paint. Its waterbased, goes on smooth, with great coverage and you can right on it with chalk!
 
 
I used the sprayable adhesive to adhere the fabric word tags to the tray. What's great about this adhesive? It is not permanent, so I can change out the fabric word tags for something else when I feel like it.
 
This is how I made the tags:
I typed the words on my computer. I sprayed an A4 card stock page with the sprayable adhesive, cut my fabric to size and smoothed it over the paper. I placed it into my printer and ran it through.
I peeled the fabric off the paper and cut out each tag to stick to the tray.
 
 The little tick shows how well chalk writes on the roof paint surface!
I ran a ribbon through the openings at the back. tied a bow and hung it!
And there you have it, easy as pie and dirt cheap too!
 
I hope you are enjoying the coming of Spring and all your Easter preparations! Here in Cape Town we are getting ready for the long, wet winter months...brrr!
 
You can often find me at these fabulous parties:


Monday, March 25, 2013

Decoupaged Mannequin


Hello my lovelies! This week I am so excited to introduce you to Mademoiselle Aimée.
I believe she had fallen on hard times after a celebrated career as a infamous famous burlesque star, and ended up on the fleamarket where she was sold off for $10.


 When she looked into the mirror her true image of style and beauty did not look back at her. She was once admired for her Joie De Vivre and she had a certain Je ne sais quoi that charmed everybody. Her look was now a far cry from what she epitomises, a romantic at heart with a carefree enjoyment for life! I brought her home with promises to make her beautiful again!

{So, I am known for deleting before pics. You will just have to imagine a gold spray painted torso and a bamboo kinda base}

For her make over, I gathered the following:
1. Primer and brushes
2. Vintage sewing patterns
3. Heritage multimedia sealer
4. Heritage glazing medium
5. Heritage matte varnish
6. Several images from the Graphics Fairy
7. Vintage music sheets - A5
8. Pair of scissors

Then on to the fun part!
I gave her torso a coat of watered down gesso to cover the ugh gold! While that was drying, I tore up scraps of vintage sewing patterns for layering. I worked in small sections, kept layering the paper until her entire torso was covered. I made sure that I secured the paper around and over all the edges. The sealer stops the ink from bleeding and also acts as an adhesive. Then she had to stand overnight to get completely dry!

Should have taken a pic at this stage....duh!

The next day I printed several images off  The Graphics Fairy. Like this beautiful rose.
  
Victorian Image Red Rose
I printed my images on the vintage sheet music and cut out the parts that I wanted. The images were then applied using the same method as the sewing pattern until I was happy with the design. I used the heads of the roses on her décolletage and cleavage and filled in other parts with leaves and left over sheet music scraps...it took on a life of its own! 

Then I thought it would be so fun to add images of beautiful french women. I went back  to The Graphics Fairy. While I lingered there, I found the lovely 'Pariesien' label and just had to use it. I also added a vintage numbered game piece as a fun addition!
To finish her off, I slathered her in glazing medium followed by matte varnish.


I think Mademoiselle Aimée is Trés Chic. Now her outer beauty reflects her inner beauty and self-confidence!

Then I turned my attention to the stand and base! Here I did some layering with CeCe Caldwell Omaha Ochre, Alaskan Tundra Green and Mesa Sunset. I distressed with a damp rag followed by a good waxing
and buffing!


She makes me smile everytime I lay eyes on her, If I think back to what she looked like on that dusty fleamarket all lonely and sad!

I hope your week started off with a bang and loads of inspiration for your next project!


You can often find me at these fabulous parties:


Thursday, March 21, 2013

My OOPS Craft Cabinet

Hello from the beautiful city of Cape Town. 
 
I've been busy with several projects this week and mistakenly deleted a file with all my before pics....so there will be no Before's for the next few posts:(
 
Well, do you sometimes feel like one of your painted pieces has an identity crisis? This is the way I feel about my latest project! 
 
I bought a solid imbuia ball and claw doorless buffet for a steal more than a year ago. It sat in my garage because I just did'nt know what to do with a buffet sans doors. Then it struck me that it could spend the rest of its life as my craft cabinet.  
Now I have seen other doorless cabinets on Pinterest that looks amazing! I had a wild idea to paint Stripes with a signage over the top and decoupaged dictionary pages on the inside....what's wrong with this picture? It did'nt strike me until the transformation was done.
 
The top looks all Frenchy, and everything else looks very Farmhouse! Now I beg you with tears in my navy blue eyes....to tell me once you've read this post if you think my craft cabinet is neither here nor there!

The low down

I found a great tutorial Here for painting stripes on furniture. How amazing is this desk people?!
For my re-do I decided to go with a CAFÉ AU LAIT look with some blue color thrown in for good measure. I slapped on a coat of Ce Ce Caldwell Khansas Wheat and did the stripes in a mocha and light blue color.
It took me forever to figure out that I needed an unequal number of the mocha stripe so that I end up with the same mocha color stripes on either side and the Khansas Wheat at the ends. It became very confusing real fast! 
 
It was something like this (after about 4 attempts):
Width is 103cm, area for stripes must be 90cm, mark off nine (unequal number, remember) 10 cm stripes, and don't forget to account for the 13 cm left over by leaving a gap of 7.5 on either end...That was easy to work out...Ha! 
 
When it came to math, I think I ended up at the back of the queue and got the scraps...LOL. Anyhoo! I was happy when I finally figured it out and could start painting my stripes.
 I found this beautiful CRANE BROS. advert from The Graphics Fairy.
 
 
I used the graphite pencil method to transfer the signage, and painstakingly filled in all the details...Phew!
 
Then I used podge to decoupage the dictionary pages to the inside of the top shelf and gave it a blue wash! Then I got lazy tired and ended up just painting the bottom shelf in blue!
I distressed the cabinet with a wet rag, waxed it and buffed it out!
Here she is in all her confused glory!


For styling I shopped my house and managed to get some decent vignettes together! 


That sepia pic is moi at age 7 and of course Miss G had to be included!
 
Is the verdict out yet? Does my craft cabinet suffer from an identity crisis?


You can often find me at these parties:


Sunday, March 17, 2013

Playing with faux zinc finishes

Hello and welcome back! I hope your weekend was sugar and spice and all things nice!

I love trying the faux zinc finish that I've seen all over blogland! This bucket was my first attempt. It made its first appearance when I posted about my cabinet Here.
 This week I took an old wooden bird cage and gave it some pizzazz! For styling I painted some eggs and made a sweet nest.
 I used real eggs by making a small hole on either side and slowly blowing air into one hole until all the content ran out the other end! I used the Heritage Multimedia range and some latex paint. First I sealed the eggs with multi-surface sealer, followed by the paint job. After the paint, I applied the glazing medium and then finally a coat of gloss varnish. I got my Heritage products from Jansen art store.
For inspiration to make the eggs look 'authentic' I turned to Angie from Knick of Time. I love these awesome Antique Bird Egg prints available from Knick of Time on Etsy. I purchased quite a few of these prints for framing!
Digital Download Antique Bird Eggs Print for Papercrafts, Transfers, Pillows, Scrapbooks, and more.  No. 4
Here is my version of speckled eggs!
 
And here is the finished birdcage!
To achieve the look, I layered the birdcage with light and dark grey colors. Then I mixed some gesso with silver gilding wax and used a stabbing motion to get the fauz zinc effect.
You can see the variation better in the next pic!

To get the rust effect on the wire, I put some burnt umber paste on a small brush and lightly smeared it on here and there.
Here is the before. It was in dire straits...LOL!

Now it looks a whole lot better. Don't you think?!


I hope you love the addition of the fresh carnations, crinkled ribbon, the bird's nest and those darling eggs! I did'nt buy anything new for the styling. I shopped my house and my craft stash and tried different things until I came up with this:)


Now for a sneak peek. I'm trying to earn my stripes(impish grin)!


You can often find me at these parties:
 

Saturday, March 9, 2013

Mid-Century Modern Cabinet Make Over

Welcome back my lovelies!

Cape Town is abuzz and gearing up for the spectacular, but gruelling Cape Argus Pick n Pay cycle tour. Our weather is getting cooler and it looks like winter is coming around early!

Anyway back to my post!

I loved this retro cabinet when I saw it on Bid or Buy Crazy R1 auction. I love the clean, simple lines of the piece and it did'nt look like it needed too much work. I put up a maximum bid of R100 (about $10) and nobody else bid higher, so this baby came home to me!
Here is the before! I did'nt let the dark scorch marks and the water marks on the top put me off!
  
Here is my messy kitchen counter!

See the bowl of salad in the background? Bad girl, I forget to eat when I'm excited to see the end result!


For the transformation I used CeCe Caldwell Omaha Ochre as a base color, and layered Alaskan Tundra Green over that. The green was also used on the legs. The sides and the trim was done in Young Kansas Wheat. Now, the colors looked very light, but I knew that the wax would kick it up a notch!
The antique dress form image is from The Graphics Fairy. There are many to choose from, but after much deliberation, I settled on this one!
I used the graphite transfer method, paint pens and Heritage acrylic paint to complete the transfer. Then I spotted the cute Frenchy gift tag in my stash. I modge podged it onto the drawer front, aged it up a bit and distressed the edges! I think it makes a sweet addition to the overall look. Once again 'Less is not more' for Moi!
The distressing on the cabinet was done with a damp rag, I applied clear wax and then light ageing wax!
I bought the cute crystal knobs at Handles Inc. They have a huge variety of hardware and I spotted some awesome hardware for that farmhouse look and made a note to self!


Is she a cutie or what?!!! This cabinet will be a cool addition to my soon-to-be craft room!


I also dabbled a bit in mixed media, but more about that later!
You can often find me at these parties:

01 09 10 11 12
Blogging tips